Thursday, November 29, 2012

Playing catch up....Color Themed Days at School!

Since I am just launching my Bento Blogging, I thought I would do a few posts over the next while to catch up on some of the previous Bento Boxes that I have packed and sent this year for Miss Lynden.

Her JK class has had a theme day weekly that co-insides with a particular color that they are learning in class.  The teachers sent home a notice to ask that parents send the kids dressed in a particular color for those days.....so, me being me,I took it to a whole new level and coordinated her lunch to match as well.  What else would you expect right? (I know they think I am nuts!!!)

Here are the theme days we have done so-far this year:

Blue:  I was JUST starting the Bento Box adventure at this point so I used the accessories that I had to jazz up with blue.  Mixed grapes and raspberries, heart shaped sandwiches, "blue" wording cut out of fruit leathers, swiss cheese crackers, Baby Bel cheese, nutrigrain bar, mixed snap peas and carrots, and a mandarin orange.

Now, I am rolling with this lunch adventure.....I brainstorm before I do my weekly grocery shop now....look out world!

Yellow:  Yellow beans from our garden (frozen), jello jigglers, sanwich with star cutout of jello, babybel, popcorn twists, pinneapple pieces and a banana

Orange and Black day: Babybel, cheese nips, carrots, blackberries, oranges, sandwich with cheddar cheese cutout, and cheesies.....can you spot the speckled frog?

Green Day:Cucmbers, veggie sticks (munchie aisle), frog sandwich with spinach tortilla face, nap peas and celery with ranch dip, pickles and grages....can't forget the green teddy bear on the juice box too!....can you see the speckled frog in this pic?  I know my daughter appreciates the surprises in her lunch every day haha  She never knows what creature might be looming in her lunch when she opens it!

Pink: pink cottage cheese (made with Lynden so that she knew what it was and was ok eating it, she loved it!), cranberries, pink center cookie, raspberries, Kitty sandwich with bologna peeking through for pink ears, pink wafer cookies, and watermelon balls.  (This color was surprisingly hard to get a well balanced lunch)

Next up is Brown....and I think I am doomed on that one!  Especially since my daughter will not eat chocolate (not complaining).  Ideas?

We have so much fun every week going to the grocery store together.  I tell Lynden what color she has that week and we brainstorm and have an adventure hunt in the grocery.  Its so fun seeing her mind turning all through the store; thinking and looking for options!

Stay tuned for the colors yet to come!

Friday, November 23, 2012

Sick day...

Well, today can be chalked up as our first official "sick" day of the school year.  Munchkin started feel a bit off last night, and then was up several times in the night with a horrible whooping cough and the start of a fever.  So....mom made the call and took a sick day to be at home with her and hopefully mend her back to health in time for the Santa Clause Parade tomorrow!

So, after about an hour of snuggles, and her temp getting to 38.8, I found myself staring at an adorable sleeping beauty.......
Photo: My sick, sleeping beauty....so precious

Sitting there, I realized that while she was out, I might as well get cracking and start some Christmas baking (since our couch is right beside the kitchen, only separated by an island).  So off I went....let the Christmas baking BEGIN!

After an hour or so I was left with 7 1/2 dozen (made double batch) Sparkling Chewy Molasses Cookies...YUM!

Here is the recipe if you want to test them out yourself:

Sparkling Chewy Molasses Cookies

Ingredients:
* 2 cups all-purpose flour (spooned and leveled, or 10 ounces)
* 1 1/2 teaspoons baking soda
* 1 teaspoon ground cinnamon
* 1/2 teaspoon ground nutmeg
* 1/2 teaspoon salt
* 1 cup sugar
* 3/4 cup (1 1/2 sticks) unsalted butter, softened
* 1 large egg
* 1/4 cup molasses, blackstrap works well here
* about 1/2 cup chunky sanding sugar
Directions:
  1. Preheat oven to 350 degrees.
  2. In a medium sized mixing bowl whisk together flour, baking soda, cinnamon, nutmeg and salt.
  3. Put butter and sugar in the bowl of an electric mixer until combined. Beat in the egg, and then the molasses until just combined. Put mixer on low and slowly add the flour mixture just until dough forms.
  4. Spoon 1 tablespoon of dough at a time, roll into a ball between your palms, then roll in sanding sugar to cover all sides.
  5. Place on cookie sheets spaced three inches apart (cookies will spread while baking).
  6. Bake one sheet at a time until edges of cookies are just firming up, 10 to 15 minutes. I found 11 minutes to be perfect in my oven which runs slightly too hot no matter what you do.
  7. update: If you freeze the balls you can bake them by taking them out of the freezer and putting them right in the oven. It’ll take about 15 minutes at 350. The cookies will spread a little less, and crack a bit.
  8. Allow to cool on baking sheet for a moment then transfer cookies to racks to cool down.
  9. Will keep for four days in an airtight container.
Makes three dozen cookies, more or less.
Enjoy!

Thursday, November 22, 2012

Bring on the Bento Entourage….

                At the beginning of my Bento Box adventures I did a lot of research online and it mainly was based around containers and boxes to pack the lunches in.  I wanted to find a great container that would be sectioned off, or have the option to not use sections when I have larger items to pack.  This was NOT an easy thing to find considering I live in a small town…sigh.  But thankfully, I live on the US border to I do have a US mailing address and can order anything I want online, but sadly doing that you are ordering blind and can’t see just what the product is up close and personal.  So, I began my search locally first.

               I really liked the Lock n Lock sets found at our local Walmart, but I couldn't find any in stock that had compartments.  I ended up buying two of them anyway, the sandwich size, and I planned to use silicone baking cups to separate the snacks/food inside the container. This would not work well for liquids or wet foods very well (as it wouldn't keep them completely sealed off) but it would work in the meantime.
                The lunch box that I had originally bought (pre-Bento Boxes) was this one below.  I wasn’t too crazy about it because you can put in the containers flat, but then it is zippered up and then immediately tipped on its side and then taken off to school…to jiggle, shake and do its “off-to-school” jig……not so friendly for the fantastic food creation you took the time to nicely pack.  But, it would have to do for now until I set my sites on the ideal bag for my new Bento Box adventure.

                I did end up finding the same Lock n Lock containers but with sectioned off compartments built in online (showed in picture), so I ordered up one.  The sections are great for her first nutrition break, when I pack little snacky foods and then the second nutrition break I have her main “lunch” with the sandwich and perhaps a treat to go with in the container).
                I went on more of a mission and ventured over to the States to see what Kmart would offer for lunch box options.  To my surprise I found some GREAT containers, these were perfect for what I wanted!  The product line is called LunchBlox™ But after buying some and bringing them home I realized they were too wide to fit properly in the lunch kit I had.  So, off I went to Walmart to pick myself up a proper vertical sitting lunch kit (please learn from my mistake and buy the proper lunch kit first to avoid buying two) so I could stack my containers properly.  With the handle on the top it is perfect to keep the food sitting upright while it’s travelling to school, and I still have enough room to put a few little freezer packs in to keep cold, and drinks go in the separate zippered part on the bottom!  Let the packing begin!

                Our local Walmart does have the cubed set like below, but I wanted two containers and not a bunch of little ones (the ones on the top of the set in the pic).  I LOVED how it had the ice pack built right in that clipped between the containers, and if you look online (they didn't have in our local Walmart or Kmart in the US) they have the same option for the rectangle version too. Plus a coupon (valid in US only though)! 
 
                There are SO many options for Bento Boxes though; if you look online you can get every type of shape, size, character etc.  I wanted to keep it pretty low key and cost effective though.  I would LOVE to have 50 different ones that I can co-ordinate with the lunch I am packing that day, but let’s be honest here, it’s just not economical to spend that much money on containers (in my mind anyway).  These containers I have so the job just fine if you ask me!

                I do still use the original lunch bag and square containers, but definitely prefer the vertical lunch box and rectangle containers, highly recommended by me.  

I just recently found another great site online for a lot of great options to get Bento Box packing started.  They have cute sets with proper containers and the lunch bag to fit those containers (so you don’t’ have to play the guessing game on sizes like I did).  In the future I might order another set from here to mix things up more.  Here is the ones I am eyeing up!  Even comes with a drink container :D
                So as you can see it can be pretty easy and cheap to get a cute set of containers and bag to meet your needs, but just make sure you follow my mistakes first so you do it the right way the first time :D  If you put a little thought into the type of container you are liking for packing, then shop for container and the coordinating lunch box from there.  Hope this helped to get you started on your own adventure!

Anyone have any other tips/hints/suggestions when looking for Bento containers and lunch bags?  Any favorite sites for selection?

Wednesday, November 21, 2012

And so...my journey begins....


Hi there, I’m Laureen!  This whole blog thing is all so new to me, but I am intrigued and eager to get rolling and learn as I go., please bear with me!  I am a married mother of 1 adorable and very opinionated 4 year old who just started going to full time 5-day-a-week Junior Kindergarten this year!
About a month ago, I saw a great post on facebook from a friend.  She was having so much fun packing her daughters lunch, and it included a picture…..that awoke a beast inside of me that was longing to get out! (I can’t say she didn’t warn me though).  She introduced me to the art of Bento Boxes!  I started to research online; got some GREAT inspiration from this blog and of course my friend.  You can visit her over at Mudpies and Melodies.
Starting out was pretty easy to be honest.  With just the baking supplies I had at home I came up with some pretty cute designs on my own.  There really isn’t a real need to order tonnes and tonnes of supplies to get started on your Bento Box adventure.  Using simple dollar store rings, small trinkets, and basic cookie cutters you can come up with some pretty cute things to jazz up your child’s lunch.  
I was getting comments right from the start on the fun lunches.  People asking just how much time I spent making her lunch every night, and Teachers were saying how they were using the lunches as show and tell every day!  Little did they know that it really doesn't take much time at all to compile a cute lunch, it’s all in the display.  A few extra cuts, arranging and of course cute cutters is all you really need.
I did however dive deeper into Bento land, ordering myself a few extra food picks, cutters and of course some 
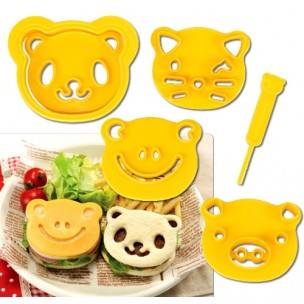
great Boxes to assemble in.  One of the BEST purchases I made was the CuteZCute Sandwich Cutters .  This set is so fun to play with, pretty cheap, and gives you SO many options to jazz up sandwiches.
   CuteZcute Bento Sandwich Cutter and Pastry Stamp Kit  
A key purchase was a proper lunch kit that would carry the boxes properly (upright and not laying down and shaking all over) until she opened to reveal her daily surprise.  There are many designs available online: Ebay , Amazon, or my favorite online Bento store All Things For Sale, but I ended up just purchasing some very do-able sectioned containers and an upright lunch kit from Walmart.
My daughter has always been a decent eater but I loved this idea because it makes the lunches so fun for her and her friends to see every day.  At her school she has two “nutrition breaks” instead of 1 lunch, so I tend to pack 1 container with snacks for her first nutrition break at 10:40 and then a larger one for her break at 12:40.  
One of the very first boxes I packed was for her 4th Birthday!  She was so excited; I had to make it special.
Birthday Box: Star shaped cucumbers with pomegranate seeds, Cheddar rice cakes, swiss cheese crackers, #4 cheese shapes, jello jigglers with #4 fruit leathers, #4 sandwich with fruit leather and sprinkles on top, carrot sticks, fun marshmallow sticks, and sprinkles in her mixed fruit!

When I receive her monthly calendar of events for her class I get VERY excited  now because they have theme days.!  The most common theme day so far has been a weekly “color” day!  The colour day co-insides with what they are learning that week.  Kids are asked to wear that color of clothing for the day and of course I go the extra mile with a color coded lunch as well!  So we have fun brainstorming and then heading to the grocery store together on a mission to find that color in foods!  
Here are a few fun ones so far:
Orange and Black day (week of Halloween):  Orange slices, a pumpkin shaped sandwich with a cheddar cheese open face, cheese curls, carrots with cutout stars, blackberries, cheese nipps with mini choc chips (with a cute orange and green frog creeping in),  and a cutout BabyBel Cheese to finish it all off.

Green Day: Cucumbers as flowers, Spinach Tortilla Frog Sandwich, veggie crisps, snap peas and celery (with ranch to dip of course), pickles and her favorite green grapes…can you spot the green frog in there with black spots?

I also had a TONNE of fun the week leading up to Halloween….she didn’t know what to expect every day when she opened her lunch.

Spiders! Mixed fruit, mixed veggies, spider hot dogs laying on a spider web, a pumpkin Babybel, ketchup to dip her hot dogs in, mac n cheese with an invader!

Mummies! Fruit cup with pumpkin face, a few fruit, orange jello, witch broom sticks made from mozza string cheese and pretzels, a provolone faced mummy sandwich, cute mummy hot dogs, and of course a mummy juice to cap it off.

Ghosts! Cottage cheese in a cup with raisin eyes, mixed fruit, mixed veggies with dip, marble cheese faced sandwich, cheese house, marshmallow ghosts and some pomegranate seeds.

Trick or Treat! A little man dressed up in his pumpkin for trick or treating, some cheesies, cheese string ghosts on a bed of mixed fruit, carrot slices with a pop or eyeballs, trailmix with cheerios, cheese nipps, and raisins.

                It has got to the point where she asks to see her lunch every morning because she can’t wait until her nutrition break to open!  The other day she requested a “kitty cat” lunch….so here is how it came out
Hello Kitty sandwich, goldfish in danger of being eaten by the cat, mixed fruit, jello in a cup, flower cheese slices, flower cucumbers with carrot centers.

                You can find inspiration anywhere and you just have to remember to dress it up and have fun.  I have found she is having just as much fun as I am with this, and she is eating more because its fun to eat!  I have parents telling me every day that I will get so tired of packing lunches , but I really doubt that.  I plan to keep it fun for both of us, I truly enjoy this!  My husband just shakes his head as he hears me giggling away as I’m making the Bento Boxes every night……

Do you have any fun Bento Box tips, hints, suggestions to pass on?